During my travels, I used both a digital SLR and a compact point and shoot to capture my images. Mostly, I brought the P&S along so that I didn’t have to drag my big camera into places where it would be very conspicuous, but I actually managed to get some pretty great shots with it. Using it constantly for more than a year allowed me some time to experiment with the camera’s technical settings, and I figured out a few things that improved the technical aspects of my photographs. Here are a few tips, based on my year of experimenting and discovery, to improving the technical aspects of your photographs. Combine these tips with the composition tips from the last article, and you’ll be producing some spectacular shots in no time. (For the record, my SLR is a Canon EOS Digital Rebel XT, and my point-and-shoot is a Pentax Optio W10.)
Turn the flash off
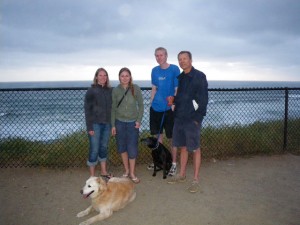
The default settings on most point and shoot cameras involve an auto setting for the flash. The camera decides if it needs the flash or not, and turns it on or off accordingly. A flash is never a good substitute for natural light, however , and it’s actually unnecessary most of the time. If you’re shooting outside, turn the flash off, especially if you’re shooting landscapes and wide-angle shots. The camera might read that it needs extra light, but the tiny flash bulb will do nothing to highlight those mountains in the distance. You’re really just draining your battery. The only exception to this rule is the fill-in: If you’re shooting a photo of a person with a very bright background, often the person will appear very dark. Turning the flash on manually in this instance will ensure that both the background and the foreground subjects receive enough light (the subject should usually be within about 8 feet of your camera. Any farther and the flash will just be ineffective).

Though cloudy, the main light source is behind the subjects, requiring the use of a fill-in flash. (Me with my relatives in California)
Use Tripods and Timers
If you’re shooting inside, try to capture as much natural light through the windows as possible, and use the interior lights as fill-ins. You can use the indoor setting on your camera, which will adjust a little bit for the lower light, but I find that the setting almost always turns the flash on. One of those tiny, bendable tripods will help you get around this issue. Turn the flash off and set the timer, and your photo will be properly exposed without registering the movement of your hands. Or, find a makeshift tripod: use a stool or a countertop, or anything you can set your camera on to keep it steady.
You can also use the timer even when you’re hand-holding the camera. I’ve gotten pretty good at pressing the shutter button without moving too much, but it’s impossible to hold completely still. The timer helps avoid the motion caused by pressing the button. My camera, and likely yours too, has a 2-second and a 10-second delay. The 2-second delay can avoid the shutter shake. (The 10-second timer is too long; you’ll be moving by the time the shutter releases.)
Squeeze the shutter button
The act of taking a photo can sometimes be what ruins the photo. Try this: Instead of hovering your finger over the shutter button and then tapping it when you’re ready to shoot, press the shutter release button halfway before squeezing it for your photo. The reasons for this are three-fold: On my camera and on many others, the auto-focus locks when I press the shutter release halfway before taking the shot. Also, there’s often a delay between when you press the shutter button and when the picture is snapped, so pressing the button halfway reduces this delay significantly. Thirdly, it reduces the shake that pressing the shutter button causes. Instead of tapping the button when you want to snap the picture, you just squeeze harder. It’s less movement for your hand, and therefore less movement for the camera.
Use the Beach Setting for Back Light
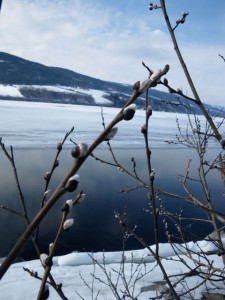
Using the beach or snow setting to shoot backlit shots can help correct the exposure. In the last article, I encouraged you to avoid backlit shots. But, they can be beautiful and dynamic, and sometimes you don’t have a choice except to shoot into the sun. A way to get around that is to use the beach or snow setting (or bright light setting) on your camera. This is intended to adjust for the increased amount of light reflected off of the water or the snow, but it also works when you point the camera directly at the sun. Using it will depend on the scene and how much detail is required to be in the foreground, but it will often avoid the washed-out look of most backlit shots. Of course, use this setting for snowy, sunny days as well.

Backlit photos can be very dynamic, but hard to expose correctly. Bright light camera settings help. (Roskilde, Denmark)
Use Macro for Close-Ups
To get very close to a smaller object in order to shoot it, it helps to use the macro setting on your camera. The macro setting is usually found under the focus settings, not the light settings, and allows the camera to “see” things that would normally be too close to focus properly on (point-and-shoot cameras usually need at least 3 or 4 feet to focus properly). So when you’re shooting the ripe berries in your raspberry patch, or trying to capture that perfect fireweed blossom, switch to macro and you’ll be able to lean the camera in much closer, eliminating the extra, unnecessary background and making the object the star of the show.
Use the Optical Zoom
Your camera has two types of zoom: optical and digital. The optical zoom changes the lens configuration, and the digital zoom pushes in on the pixels in the photograph. Zooming digitally will get you closer, but it will often add a lot of “noise” or blurred, pixelated sections, and will not result in the best photo. Zoom into the limits of the optical zoom, but, for the best images, don’t go beyond. This tip also goes hand-in-hand with a compositional tip: Get rid of the junk. Use the optical zoom to get close to the subject, and eliminate distracting background. If it’s a small object, use the macro setting (see above). If you’re shooting a moose wandering through your yard, zoom into see him nibbling the willow branches. If you’re shooting your house, you don’t need passing cars and street signs in the shot.
The key to mastering photography and any skill, really, is to practice, using these tips and figuring out your own, until you have figured out your camera, your style and how to put them together. The instant feedback the digital format provides has made me a better photographer. I can see right away which experiments worked and which didn’t, and can start adjusting for that right away. Don’t take just one shot of anything: Take several shots, and choose later which ones are the best. And, since it’s digital, you just delete the ones that aren’t up to par.
Using a point and shoot doesn’t have to mean all your photos are snapshots. Adjusting the technical settings, and following the rules of composition, will allow you to take fantastic shots of just about everything you set out to photograph. You’ll know you’ve hit your stride when you hear this: “You took that with a point-and-shoot? Amazing!”
(I took all of the photos in this article with my Pentax point and shoot during my year of travel through Europe and the U.S. See more examples of my photography here.)

