Web design is all about visual impact. It’s rare that a website doesn’t inspire you to think or feel a certain way, and there’s no better way to achieve that visual impact than by using great photography.
Ideally, everyone would be able to afford the services of a professional photographer, but for most of us, their services are beyond the budget. That doesn’t mean you can’t get good photos for your website, however. You can take them yourself and, with the following tips and a bit of practice, you’ll be producing images that are good visual representations of your home and B&B, and visitors will thank you for it—by making more reservations.
Following are a few rules and tips for composing your photo: how to place the elements within a frame for the most dynamic scene possible.
Rule of Thirds
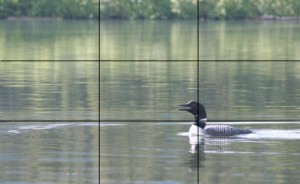
The rule of thirds states that images are more dynamic when the main subject is placed in the upper or lower third, or right or left third, of the image, rather than in the center. Apply it like this: Look through your viewfinder. Imagine two vertical lines splitting your image into thirds. Now imagine two horizontal lines. The intersections of those lines are the most dynamic points in your image, so if you can, it’s best to place the focal point of your image onto one of these points. Let the rest of your subject extend into the other thirds. For example, if you’re taking a picture of your house, with the mountains or a lake in the background, try this: Place the house in the lower left third, and let the background take up the rest of the frame. How about a moose wandering through your yard? Place him in the lower right hand corner and let him appear to be wandering into the rest of the frame.
Foreground & Background
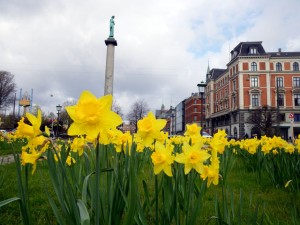
Adding a prominent foreground feature into a photo with a distant main subject adds depth and character to a photograph. We humans always need a point of reference to determine where we would fit into a scene, and placing an object in the foreground is a good way to provide that. Next time you shoot a mountain scene, stand so that there is a tree or a bush in the foreground of your scene, way off to the left or right. Make sure it frames the real subject, instead of stealing the spotlight. Trees with large lower or upper branches are good for this. Get down on your knees and put tall stalks of fireweed in the right or left foreground. The image you produce will carry much more excitement and beauty than one without the foreground images.
Depth of Field
Not everything in a photo has to be in perfect focus. In fact, if you’re trying to achieve a certain mood or feeling with your image, you’ll probably achieve that much more easily if either the foreground or the background is out of focus. Try this. Focus closely on a small object in the foreground of an image. A berry on a bush, for example. Let the rest of the background blur, and see whether your photo is mroe dynamic or less. Or, if you’re taking pictures of your breakfast, try using this technique to add to the yum factor. When you’re shooting landscapes and adding a foreground feature, as in the previous example, let the tree or bush in your foreground stay out of focus — this will offset and magnify the mountain that is the real subject.
Lighting
Proper lighting is by far the most important factor in photography, and probably the hardest one to master. First of all, determine where your light source is. If it’s the sun, try to place it to one side of you, or behind you. If a light source is very bright, place it off to one side and use a white board or backdrop on the other side to fill in the shadows. Shooting into the sun can be effective if done properly — if you’re using a point-and-shoot, and it has a bright light setting, try using that to see if it works. If not, it’s best to avoid those backlit shots, as most of the time they are washed out and too bright. When you’re shooting inside, make sure that proper lighting is available. If you’re taking pictures of bedrooms, for example, try leaving the lights in a room off, and leaving the window shade open. Try to avoid putting the window itself into the photo, though, as it will just appear as a block of white light. If you have a tripod, try to use that before using the flash — natural light is always best. If you can adjust the direction of your flash, try bouncing it off of the ceiling or off of a white board to diffuse the light a little more. Sometimes lighting is difficult to get right; you’ll probably have to experiment with a few different configurations before you find the right one.
Try experimenting with some of these tips and see if your photos improve. Next week we’ll discuss some of the more technical aspects, particularly with using a point-and-shoot camera, to achieving great photographs.


